

How To Install Zabbix Proxy On CentOS
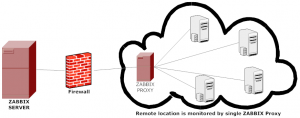
Zabbix proxy is the way to have multiple hosts from different sites monitor by one central server
*. Zabbix-proxy should be in the same version of the main server !
*. SElinux is a great security addition but if you want to disabled it : nano /etc/selinux/config -> SELINUX=disabled (will disable the SElinux) .
Install Zabbix-Proxy
First update the repo files in order to get the latest version, in this example 3.4 :
rpm --import http://repo.zabbix.com/RPM-GPG-KEY-ZABBIX
rpm -ivh http://repo.zabbix.com/zabbix/4.0/rhel/7/x86_64/zabbix-release-4.0-1.el7.noarch.rpm
On CentOS 8 you might get error regarding libssh2 missing, you can install it in this way:
To use libssh2 you must enable the EPEL repo. After that libssh2-devel can be installed
yum install epel-release

yum install libssh2
In case of develop environment you can install the libssh2-devel
yum install libssh2-devel
Then install the zabbix proxy
yum install zabbix-proxy-mysql
After that install maria-db (mysql server if you haven’t done this from the Linux installer already).
yum install mariadb-server
Enable the server and make the service run with boot :
systemctl enable mariadb && systemctl start mariadb
Lets start MariaDB installation, enter the password for SQL administrator (none if you run it for the first time,Then choose password) :
mysql_secure_installation
mysql -u root -p
We will create Database called: zabbix_proxy
create database zabbix_proxy;
Lets create user for the Database=zabbix_user and the password=zabbix
grant all privileges on zabbix_proxy.* to zabbix_user@localhost identified by 'zabbix' ;
flush privileges;
exit
Then import initial schema and data. Make sure to insert correct version for 3.4.X. You will be prompted to enter your newly created password.the script are here:
/usr/share/doc/zabbix-server-mysql-3.4.x, zabbix_user=username , zabbix_proxy=database_name , -p=password (in our case ‘zabbix’) :
zcat /usr/share/doc/zabbix-proxy-mysql-4.0.1/schema.sql.gz | mysql -u zabbix_user zabbix_proxy -p
configuring Zabbix proxy
nano /etc/zabbix/zabbix_proxy.conf
The values in the file should be corresponding with this setting according to this example:
Server=<IP of your zabbix server>
Hostname=<Name of your proxy>
DBName=zabbix_proxy
DBUser=zabbix_user
DBPassword=zabbix
We need to open the firewall port for network comunication :
firewall-cmd --permanent --add-port=10050/tcp
firewall-cmd --permanent --add-port=10051/tcp
firewall-cmd --reload
And the last thing is to enable the zabbix proxy and make it load with boot :
systemctl enable zabbix-proxy
systemctl start zabbix-proxy
Now Follow the zabbix proxy log to make sure all is well :
cat /var/log/zabbix/zabbix_proxy.log
You can also make sure the server running with this :
netstat -anp | grep zabbix_proxy
Configure Zabbix Proxy on Main Server
-
Go to: Administration → Proxies
-
Click on Create proxy
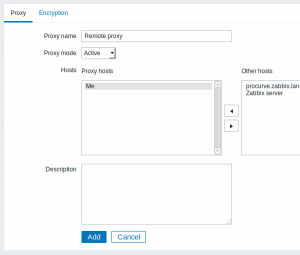
Active mode -> the proxy will be the one connecting to server and send data.
Passive mode -> the server will be the one connecting to server and get data.
proxy hosts -> is the server you want to monitor through the proxy server
You can also set encryption communication (recommended)