

Configure Shadow Copy For Windows 10
Windows 10 lack the feature of schedule shadow copy like in windows 7 and server 2008. But you Still can do it with Win32_ShadowCopy class in WMI.
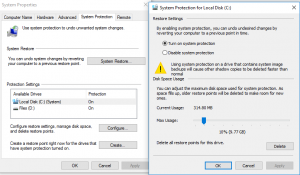
First enable the shadow copy option :
Open Control Panel -> system -> system protection tab ->choose drive letter-> click enable and set the amount of disk space you want to use
The command to run is (for drive c in this example) :
wmic shadowcopy call create Volume=c:\
to test this run on command prompt as administrator and check for creation of shadow copy
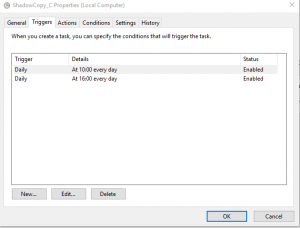
Create Schedule Task:
open Task Schedule and create task -> name it ShadowCopy_C (or any other name you want) ->select the triggers, once it was at 07:00 and 12:00 every day
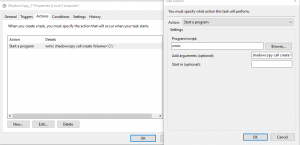
At the action tab write WMIC -> at the arguments -> shadowcopy call create Volume=C:\
Do this for every partition
Good Luck
Just wanted to say THANK YOU for this great post!
This problem was driving me nuts and I couldn’t find a practical solution to reenable those snapshots in Windows 10. This is so simple yet beautiful – oddly though nowhere described on the whole internet.
Cheers,
Alex
Cheers
Thank you! This was a huge help. Like the Alex said, I could not find this described anywhere else.
Quick and to the point!
good article… work for me.
This procedure was working for me in Windows 8 (file recuperation via localhost folder instead of menu tab). In Windows 10 however, the back-upped files aren’t visible anywhere.
I was able to get this working with Windows 10 using the instructions above. However, I had to use the following:
At the action tab write WMIC -> at the arguments -> shadowcopy call create Volume=C:\
The example above shows: Volume=’C:\’
This was causing that following errors in Task Scheduler: 0x8004102F and 2147749935 (within the task history)
Noted and fixed, Thenks 🙂
It’s still in the screenshot though.
I tried it both ways at a command prompt and both worked. Additionally, the version of the command that included single quotes (‘C:\’) worked as a scheduled task without any issues, too. It may be that Microsoft updated the command in the last couple of years to accept it with or without single quotes.
I also did not have to Run As Administrator (which surprised me), although I was still using an account that is a member of the local Administrators group.
I take that back. While trying it out at a command prompt, I did need to Run As Administrator. On the other hand, I did not have to check the “Run with highest privileges” box in the task settings for it to work there.
You may have to check the “Run with highest privileges” box if it doesn’t work as-is. If you’d like to prevent the window from popping up every time it creates a restore point (I have mine setup to do it hourly), set it to “Run whether this user is logged on or not” in which case it will run in the background without any window popping up. You’ll need to supply your password (which will be stored, hopefully encrypted) so it can run in its own little user space.
I really should have created an account so I could have edited the original post and not looked like some kind of crazy spammer. My apologies for my laziness!
If you want to avoid having to put in your password, check the “Do not store password…” box. Since that still allows access to local computer resources, the creation of the restore point still works fine.
Great solution. Thank you very much
So clear, you really helped me a lot.
Tnx
Thank you so much for this. Is there a way to create a new partition (let’s call it D for example) and have the shadow copy backups for the C Drive reside on the D Drive?
yes, you can do it through the GUI when configure shadow copy, you can choose different partition. I have a page about this subject :
https://itsimple.info/?p=1180
Dear,
Thanks, it was of great help, how can i limit the number of shadow copies to limit the disk usage.
you can play with the number of shadows with space&schedule setting. limit disk space, play with the number of the shadows accurately.
Just what I was looking for . . . but . . .on Windows 10 . . . when I use WMIC –>> “shadowcopy call create Volume=C:\” in the task scheduler I get an 0x80041014 error, and when use it at the CMD prompt, I get “Initialization failure” error.
Any ideas why?
Are you running ad administrator ?
You should run the task as Admin
You might want to add that the task must be executed with admin level user.
This post is 6 years old, I will update it soon
thank’s a lot!
“wmic shadowcopy call create Volume=c:\” –
and re-registration list of vss related services/dll-s really solved my troubles
many other instructions do not direct me that way (wmic…) re-register dll only…
problem was from cloning win10 side, but no vss storage re-assigned, imho
UrBackup failed then with much errors.
OK, this is almost perfect. Thank you. I have a script using the same, but mine ENABLES VSS and then runs your commands, then DISABLES VSS service because the first thing that ransomware attack does is deletes shawdow copies.
Would you care to share this script?
How do you get the restore option to appear for your shadow copy?